Thursday 22 December 2016

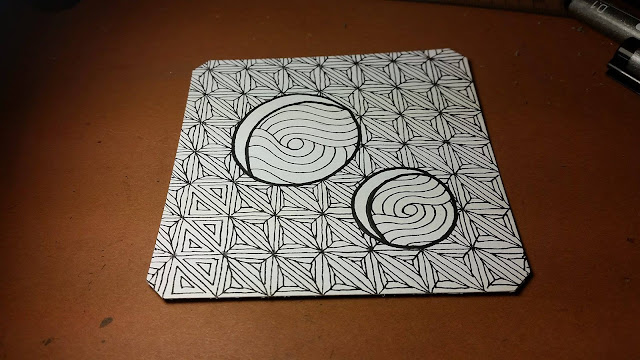
First try at Stella Zentangle


First try at Stella Zentangle


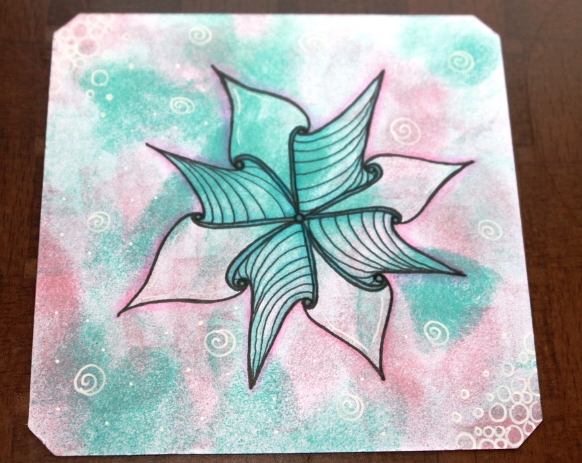
It’s just that time of year I guess. I’m seeing snowflakes snowflakes everywhere!  The Stella tangle was no different.  Right from the very first attempt I saw snowflakes.


So with my first try here, I wanted to play with some new Distress inks that I’d ordered, hence the colourful background. I shaded with my prismacolor pencils and then added some highlights (which aren’t very visible in the picture) with a white gelly roll.


Here’s the final piece:
Stella Zentangle
Stella Zentangle


Here is the before pic:


All Things Sindoo!

All things Sindoo!

 
This is my summary post of all of the Sindoo experiences I’ve had over the last week or so.  The Sindoo Zentangle pattern was created by Sharon Robinson  - the original tangle walk-through can be found here.


A special “Thank you” to Eni Oken http://enioken.com/ who posted this Sindoo challenge on her amazing FB page “Shading Zentangle”.  Be sure to stop by her website and check out her very cool books!

At the bottom of this page you'll find the 5 pieces I've done with Sindoo.  Click on the link beside any of the photos to see the full posts and line art etc. for each piece.


Last but not least, here is my video of a nice and basic Sindoo Zentangle design.


If you’re wondering where that cut on my index finger came from, well… I was trimming my toenails (TMI?) and the clippers slipped. My finger got sliced by my toenail as I clumsily fumbled not to drop the clippers.  Yes… yes I’m that girl. Sigh.


 Full post for this photo here
Full post for this photo here 
 Full post for this photo here
 Full post for this photo here
Full post for this photo here


Do you have a blog with a Sindoo Zentangle post on it? Add the link to your Sindoo Zentangle post below so others can view your work!  (please do not link to your main page, just the post with a sindoo zentangle on it)


Thursday 15 December 2016

Sindoo #5

Sindoo #5

 
I’m gonna have Mambo #5 stuck in my head all night now. Oh woah is me, the things we do for art.  Anyhoo, I’m nearing the end of my Sindoo Zentangle adventure.  It’s been quite a ride.  For an easy tangle it certainly has a lot of versatility to it.
 
This piece was created with a bit of topsy turviness, black and white. And since winter is heavily upon us in the Great White North, a little starry snowflake type design was added to the middle.
 
Finished piece first:

Sindoo Zentangle
Sindoo Zentangle


Line work:


Tuesday 13 December 2016

4th piece with Sindoo

4th Piece with Sindoo


I’m still playing around with the Sindoo tangle.  This time I wanted it to pop with some color.  I switched the focus from the petals to the “white” space by adding most of the colour there instead.  Though I like the way the purple in and around the circles turned out, I prefer the piece with the focus on the petals. 
 
I didn’t stop for a before pic unfortunately – but this is the finished product:

Sindoo zentangle
Sindoo zentangle

Wednesday 7 December 2016

3rd Sindoo #Zentangle tile


3rd Sindoo #Zentangle tile


Third times the charm right? Either that or it was just time to get really crazy! I wanted some free-floating sindoos to play with, so that’s what I did.  I also wanted to really play around with the different ways this tangle can be filled in.  I used a pencil for loose grid lines, scattered here and there throughout the tile, then got my sindoo-on. 


A couple of before pics this time…


Here’s the finished piece:

Sindoo Zentangle freeform


Here’s the piece I started to fill in then remembered to grab the camera:


And here is the final line work before shading.


2nd Attempt at Sindoo Zentangle


2nd Attempt at Sindoo Zentangle


I wanted to spice things up a little with this 2nd Sindoo piece, so I added and extra layer to the “petals” and softened the piece up with some Skye on the sides.  It still didn’t feel “finished” to me, so I added the lines between the “flowers”.  What can I say? I see them as flowers.


Here’s the finished piece:

Sindoo Zentangle
Sindoo Zentangle


Here’s the line art:


Tuesday 6 December 2016

Sindoo Zentangle 1st attempt

Sindoo Zentangle 1st attempt

 
Eni Oken’s challenge this week was the Sindoo Zentangle.  Though this is my first finished attempt, I did practice a few times first – getting those petal shapes to flow takes a few tries.
 
Line art:


Finished piece:

sindoo zentangle
sindoo zentangle


Thursday 1 December 2016

Ilana Zentangle


Ilana Zentangle


Again this week the Diva Challenge prompted us to use a grid tangle. This time though, the challenge was to mix it up, to move the pattern around to give it a different effect. 


I searched through tangles to find one that would work with this idea, a good part of them simply can’t be switched up as they fit the whole square.  Then I came upon the Ilana tangle and decided to give it a try.  Somehow it wound up looking more like b’dylan gone awry, but I think it works.


Finished piece:
Ilana Grid (b'dylan)


Before pic:

Ilana Grid (b'dylan)

Tuesday 29 November 2016

Cubine Grid Zentangle


Cubine Grid Zentangle


The Diva’s Challenge last week (yeah I’m a bit behind) was to do a grid tangle.  I decided on Cubine, since I hadn’t played with it very much in the past.  They look like windows, right? Well, when I looked outside it was sn*w!ng.  (That’s a curse word in my household).  So this is what I came up with:


Cubine zentangle
Cubine Zentangle


Line work before shading and detail:


On a side note, for the life of me it forever to find the name of this tangle.  I'm guessing after the hours of searching, it'll be stuck in my brain for all of eternity.


Rainking and Meo


Rainking and Meo

Eni Oken set up the challenge to use the Rainking Zentangle in a piece.  I had a hard time staring out with this one.  Looks easy, sure, but mine weren’t exactly popping into place.  So I took a different route with it and added some Meo into the piece as well. 


This is my before piece:


This is the finished piece:


I’ll need to revisit this one another time.

Thursday 17 November 2016

Keeko Zentangle for the Diva Challenge

Keeko Zentangle for the Diva Challenge


Keeko Zentangle on Distress Ink Background


This week's Diva Challenge was to use Linda Farmer's tangle "Keeko".  I didn't take any before pics since my camera was busy making this video. Hope you enjoy!


Playing with Distress Inks

Playing with Distress Inks


Loving the Distress inks so much that I thought I'd share a video on how I use them.  Hope you enjoy :)


Wednesday 16 November 2016

Zentangle with Distress Inks


Zentangle with Distress Inks


First Zentangle Tile with Distress Inks


This is my first attempt as using distress inks for my background. I love, love, LOVE it! So much fun! I didn’t use the mister-effect because I was anxious to get started on the tangling right away, so I didn’t care to wait for it to dry.  I plan on doing a whole lot more with these distress inks so stay tuned!


For this piece I went with a little Helen Williams style for the tangle, I wanted something that would flow and allow me to shade in different tones.  I used a regular tile, distress inks, micron .1 and .05, a gold prismacolor pencil crayon, a white prismacolor pencil crayon and a white jelly roll.  **Note: White pencil crayon just lightens and blends, does not work as white exactly on top of the distress ink.


No before pics as I got carried away  J

Tuesday 15 November 2016

Fassett Zentangle

Fassett Zentangle

 
This isn’t the first time I’ve used the Fassett Zentangle, it was once the weekly Diva challenge but it had been a while.  Eni Oken posted the Fassett Zentangle pattern as the challenge for the week and this is what I came up with.  I wanted the holes to look more like…well, holes.  But all in all it didn’t turn out too shabby. At least the Fassett part of the tile works!
 
Line art:

Fassett Zentangle before shading

 
Finished piece:


Fassett Zentangle
Fassett Zentangle

Friday 11 November 2016

Eaxy Zentangle

Eaxy Zentangle


The Eaxy Zentangle was the Diva’s challenge this week.  It took a little harder to get used to than I expected.  A few tiles were chucked out while I tried to get the hang of this Eaxy.  Also included Eni Oken's Ruutz.
 
Check out the Diva’s challenge here
Check out Nadine Roller’s Eaxy step-out here
 
Line work before pic:
 
eaxy zentangle line work


After shading:


eaxy zentangle shaded

Wednesday 9 November 2016

Grey Cloudy Smudging with Trelina Zentangle


Grey Cloudy Smudging with Trelina Zentangle


I smudged this tile first with grey pencil crayons (cloudy smudging tutorial here). Then I did the final in my piece in my Trelina training.  I think I’ve got it down now, and figure I’ll be using it quite a lot in future projects. Thanks again to Eni Oken for her amazing pattern(s) and all of the wonderful things she does for the tangling and doodling community.


There is no before pic, because as you can see, my camera was being used to record the video below.  Hope you enjoy!


Tuesday 8 November 2016

Cloudy Smudging Technique for Tile Backgrounds

Cloudy Smudging Technique for Tile Backgrounds


Trelina and Skye on Cloudy Smudging background

 
There are a bunch of techniques for creating interesting backgrounds for zentangles and doodles.  Watercolors, distress inks, etc.  Here’s a really cheap and easy way to make a funky background. 
I got the idea from my grade 8 art teacher, it's one of the few things I remember from that class.  Turns out it came to good use many (many, many, many,) years later.

All you need is: 

  • A tile or piece of paper
  • A cheap pair of scissors
  • Cheap pencil crayons (in the video I used crayola, not using my prismacolors for this)
  • Tissue
Use the scissors to grate the nib of the pencil crayon onto your tile.  When you have a nice little pile of shavings, use the tissue to color the tile.  I cover my index finger with a good wad of the tissue and use circular motions to cloud up the tile.

You can use the tile right away to tangle or doodle on.

TIP:  My best tip with this method is to use the colors you clouded your tile with to shade and color your final piece.


Here’s a finished tile I did with the Trelina pattern and Skye. 


Enjoy the video, I hope it gives you some ideas to create!

Monday 7 November 2016

Another Trelina

Another Trelina

 
Yay! I got to play with my new grey tones tiles! Woohoo! And of course, since I’m still working on the Trelina tangle, I incorporated into the piece.  Lots of fun shading on the grey tiles, was able to use a white pencil crayon and really make that white pop (though the pic doesn't do it justice).


Gonna post these in reverse…


First the finished tile


Trelina zentangle after shading


Here’s the before shading tile

Trelina zentangle before shading


And here are the materials I used to make this piece


Sunday 16 October 2016

3rd Attempt at Trelina Zentangle


3rd Attempt at Trelina Zentangle
 
Okay, so I think I might be starting to actually get the hang of this tangle.  Here I wanted to go with a few of them in one piece, and play around with the pattern; a sure sign of getting into the flow of things.
 
Before pic
 

After shading pic.

Trelina Zentangle Shaded

Friday 14 October 2016

2nd Attempt at Trelina Zentangle


2nd Attempt at Trelina Zentangle
 
I decided to try my second attempt at Eni Oken’s Trelina Zentangle pattern with sepia copic markers.  I tried to match it as best I could with for the shading with a coloured pencil.  I still don’t have the hang of this pattern yet, but slowly and surely I’m getting there.
Before shading

After Shading… I have a long way to go with this pattern…


Wednesday 28 September 2016

First Attempt at Trelina Zentangle


First Attempt at Trelina Zentangle
 
I’ve been zentangle-absent for the summer, taking advantage of the nice weather as much as possible before the brutal winter hits my little Canadian town.  I’ve been working sporadically on a larger piece in my downtime which I’m looking forward to share upon its completion.
 
In the meantime, I’d been admiring the Trelina Zentangle work of other zentanglers on the Shading Zentangle facebook page.  Thank you Eni Oken! Admiring them so much, I just had to give it a try.  Boy oh boy, was it ever a whole lot more difficult than I expected it to be.
 
I haven’t gotten the hang of yet, not quite.  But below is my first attempt.  I didn’t stop to take a before pic, because I was struggling so much with getting the pattern down.  I’ll be working on getting the hang of this until I do.  I'm predicting plenty more attempt-posts to come!

trelina zentangle shaded
Trelina Zentangle

Thursday 21 July 2016

First Attempt at B’Dylan Zentangle

First Attempt at B’Dylan Zentangle

 
“The answers m’friend, are blowing in the wind…” 
 
Love, love, LOVE this new tangle pattern!  Easy and fun!  The shading is a little tricky, and I’m not sure if I nailed it, but I’m so very happy with the rest of the shading in this piece.
 
For the first time, I use a “light source”.  Usually I just shade my zentangles based loosely on the light coming from above.  Keep in mind, drawing in general is not in my nature, or wasn’t for the first 37 years of my life.  Until Zentangle came into my life, I didn’t have an artistic bone in my body. 
 
But here! On this tile! I used the light source coming from the somewhat upper right and I think I may have actual done okay! Yay me!
 
So here is the before pic, as you can see I started to shade before remembering to take the before pic.

B'Dylan zentangle
B'Dylan zentangle before shading

 
And here is the final piece!

B'Dylan zentangle
B'Dylan zentangle shaded


Monday 18 July 2016

Feeling Flux’ed

Feeling Flux’ed

I just had the urge to flux! After my adventures with the Skye Zentangle I started on a larger project… then I wanted that quick fix of a completed tile and since I was feeling a little “KerFLUXed” I figured flux was the way to go. 

I really didn’t have any type of plan on this one – just the urge to flux and away I went. 

Here’s my before shading tile – looks like a bunch of lines really.


flux zentangle before shading

After I shaded it took form but still felt a little lost…


flux zentangle after shading

Then after the shading and adding some background it still didn’t pop. Flux me. *snickersnort* So I added a pop of colour to the bubbles and this is my final piece.  It turned out fluxin’ awesome in my not-so-humble opinion J


flux zentangle
flux zentangle


Wednesday 13 July 2016

Peace of Art

Peace of Art


The Diva’s challenge for the week was to produce a peace-themed piece.  It’s been a sad week.  Not a lot of peace around these days.


Stop the hate.

Make peace.

Be kind to yourself.

Be kind to the earth.

Be kind to others. 

It all sounds so simple, yet… 


Before Pic.


After Pic.


Monday 11 July 2016

All Things Skye Zentangle

All Things Skye Zentangle


The Skye Zentangle was created by Margaret Bremner and she really gets all of the credit here.  What an amazing pattern to create! 

I had a tough time getting the hang of this tangle. Hence the obsession with it and multiple Skye tiles/pieces.  I might have gotten a wee bit carried away on this one, but when I love a pattern, I want to get it right, and I want to learn it in a way that it will become second nature for me to draw it up on the spot.   

There are probably many different approaches to this tangle.  This video gives you the basics you need to get started.


 Changing the size of the loops and the longer lines can really alter the look of this design.  


Here are a few of my the pieces you might have already seen, but they really show some of the variations this pattern can have.


Skye Zentangle
Skye Zentangle


And finally, a look at all of my Skye Tangly goodness together in one shot. 


Skye Zentangle
Skye Zentangle


Friday 8 July 2016

Big Skye Zentangle


Big Skye Zentangle

Skye Zentangle Shaded


This piece took me quite a while to do, lots of small detail and such.  I used Copic microns and grey Copic markers for the shading.  It’s my final skye zentangle piece for awhile, as it’s time to move on to a different tangle.

Stay tuned for my next post with skye zentangle how-to video and a whole whack load of pictures of the other skye zentangle tiles I’ve completed over the last couple of weeks!


Before pic - just lines


Before all the shading and details were finished pic